Best Headlight Restoration Kit

Picture yourself driving down a dark road with headlights that barely cut through the night. It feels more like holding two candles out front than having real beams to guide the way. Cloudy, yellowed headlights don’t just detract from your car’s style; they steal visibility and make nighttime driving a lot more stressful than it should be.

1 product
 

Why Headlight Restoration Matters More Than You Think

Headlights aren’t just about looking good in the parking lot; they’re your car’s eyes on the road. When they’re clear, they throw light farther, sharper, and brighter. When cloudy or yellowed, they turn your night drives into something closer to stumbling around with a dim lantern. That’s not only frustrating, it’s flat-out unsafe.

Beyond safety, restored headlights instantly boost your car’s curb appeal. Clean, clear lenses can make a ten-year-old car look like it shaved off a few birthdays. Think of it as the automotive version of ditching smudged glasses for a fresh, crystal-clear pair. You see better, you look better, and your car feels younger, too.

The good news? You don’t need to spend hundreds on replacements or book a pro detailer. With the best headlight restoration kit, you can handle the haze at home, and no power tools are required.

Signs Your Headlights Are Begging For Help

Headlights don’t just go bad overnight; it’s a slow fade you might not notice until it’s too late. By the time you realize your beams are dim or your car looks older than it should, the damage has already set in. Here are the most common red flags that your headlights are screaming for a little restoration:

  • Yellowing and Oxidation: If your headlights have taken on a yellow tint, oxidation shows up to the party uninvited. UV rays and exposure to the elements break down the outer layer of the lens, leaving behind that dull, aged look. It’s one of the clearest signs you need the best headlight restoration kit to bring them back to life.
  • Scratches and Haze: Tiny scratches and a cloudy film can make your headlights look covered in frosted glass. Even after a good wash, the haze sticks around, cutting down on clarity and style. If your lenses always look dirty no matter what, restoration is the only way to clear them up.
  • Dull Nighttime Performance: One of the scariest signs? Your headlights don’t light up the road the way they used to. Dim beams make night driving stressful and unsafe, especially on dark or winding roads. Restoring your headlights gives you brighter, sharper output so you can see and be seen confidently.
  • Uneven Lighting: If one headlight looks brighter than the other, it’s not just annoying; it’s a warning sign. Uneven lighting usually means one lens is more damaged or hazed over than the other, throwing off your balance on the road. A proper restoration evens out both beams so your car doesn’t look tired on one side and healthy on the other.

Meet The Best Headlight Restoration Kit

When it comes to restoring headlights from the dead, our Headlight Restoration & Ceramic Kit takes the crown. Designed to cut through haze, yellowing, and oxidation, this kit doesn’t just fix the problem; it transforms tired headlights into clear, sharp lenses that look and perform like new. There are no gimmicks, no overcomplicated steps, just a smart system that works.

Inside the box, you get everything you need: Headlight Restorer IQ, HydroCharge+ Ceramic Coating, a Hex-Logic Hand Polishing Pad, a Microfiber Towel, and a Microsuede Applicator. That means no digging around for extra tools or running to the store for missing pieces—it’s all right there, ready to go.

This kit is designed for both first-time DIYers and detailing veterans. The three-step process is straightforward enough for anyone to follow, but the results are pro-level: restored clarity, boosted shine, and durable ceramic protection that keeps your lenses looking better for longer. That’s what makes it the best headlight restoration kit on the road today.

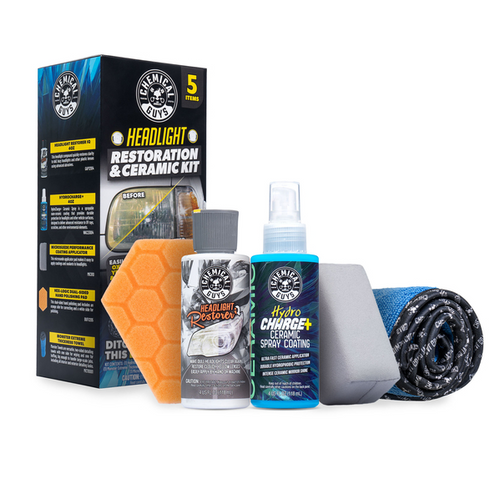
Chemical Guys Has The Best Headlight Restoration Kit

What Makes A Great Headlight Restoration Kit

Not all headlight kits are created equal, and if you’ve ever tried a cheap fix, you already know how disappointing the results can be. A truly great kit doesn’t just clear up the lenses for a few days; it restores, protects, and keeps your headlights looking fresh long-term. Here’s what separates the best headlight restoration kit from the rest:

Complete Package

A solid kit should include everything you need to complete the job without a last-minute trip to the store. Pads, applicators, towels, and the actual restoration formulas should all come in the box. When it’s all included, you can go from hazy to crystal clear in one go.

No Power Tools Required

If you need a drill or polishing machine just to make the kit work, it’s already a hassle. The best kits are designed to be done by hand, so anyone, beginner or pro, can get professional-level results. That means no extra gear, no learning curve, just straight-up results.

Long-Term Protection

Restoration is only half the battle; what you really want is lasting protection. Kits that include a ceramic coating or UV shield prevent the yellowing and haze from coming back too soon. That way, you’re not stuck redoing the same job every few months.

Beginner-Friendly But Pro Approved

The sweet spot is a kit that’s simple enough for a first-timer but still delivers results that impress the hardcore car enthusiast. Clear instructions, quality formulas, and durable accessories make the process smooth without cutting corners, earning the kit the title of “best.”

How To Restore Your Headlights In Three Easy Steps

Restoring your headlights shouldn’t feel like a weekend-long science experiment. The best headlight restoration kit is designed around a simple three-step system that anyone can master. In just a few minutes, you can go from fogged-out lenses to clear beams that shine like they’re fresh from the factory:

Step 1: Prep The Surface

Start by washing your headlights to remove dirt, dust, and grime. The cleaner the surface, the better the restoration formula can do its job. If you’ve got stubborn buildup, a clay bar is your secret weapon for leaving the lenses squeaky clean.

Step 2: Restore The Clarity

Grab the Hex-Logic Hand Polishing Pad and apply Headlight Restorer IQ directly onto it. Work the formula into the lens using smooth, circular motions until the haze and oxidation start to disappear. Once you’re happy with the clarity, buff away the excess with the included Microfiber Towel.

Step 3: Protect With Ceramic

This is where the magic sticks. Spray HydroCharge+ onto the Microsuede Applicator and coat the lens in even, linear motions. The ceramic protection locks in clarity, adds shine, and defends against UV rays, so you won’t have to repeat the process anytime soon.

Pro Tips For Long Lasting Shine

Restoring your headlights is only half the battle; keeping them crystal clear is where the real win happens. With a few smart habits and the right products, you can stretch that fresh look for months instead of weeks. Here are some pro-level tips to make your results last:

  • Wash Regularly: Road grime, dust, and pollutants love to stick to headlights, and over time, that buildup dulls your shine. Regular washes keep contaminants from bonding to the lens surface and breaking down the protective layer. The cleaner you keep them, the longer the clarity lasts.
  • Reapply Ceramic Protection: HydroCharge+ layer protects your headlight against UV rays, oxidation, and future yellowing. Just like waxing your car, reapplying ceramic every so often keeps the protection strong. A quick refresh goes a long way toward keeping your beams bright.
  • Park Smart: Sunlight is the number one culprit behind headlight oxidation, so where you park matters. Whenever possible, go for shaded spots or covered parking to reduce UV exposure. Less sun equals longer-lasting clarity.
  • Don’t Skip Maintenance: Think of your headlights like your paint; they need consistent care to stay at their best. Touch-ups with the best headlight restoration kit every few months will keep haze from creeping back in. A little maintenance now saves you from a full restoration later.

Read also:

Frequently Asked Questions

How long does the best headlight restoration kit last once applied?

Results usually last several months to a year, depending on driving conditions and sun exposure. Adding ceramic protection helps extend clarity even further. With occasional touch-ups, you can keep headlights sharp for the long haul.

Can the best headlight restoration kit fix cracks in headlights?

No, restoration kits can’t repair deep cracks or structural damage in the lens. They’re designed to remove surface oxidation, haze, and yellowing. If your headlights are cracked, replacement is the safer option.

Is the best headlight restoration kit safe to use on plastic lenses?

Yes, the kit is formulated specifically for modern polycarbonate and plastic lenses. When used as directed, it does not damage or scratch the surface. Glass headlights, however, don’t usually need restoration.

How long does it take to restore headlights with the best kit?

Most headlights can be restored in about 15–30 minutes, depending on the extent of the oxidation. The step-by-step process is quick, especially without power tools, and you’ll see results immediately after finishing.

Do I need to tape off the area around my headlights?

It’s not always necessary, but taping around the edges can help protect your paint if you’re worried about slipping with the applicator. A little painter’s tape adds peace of mind. Many users skip this step and still get perfect results.

Can I use the best headlight restoration kit if my car is brand new?

If your car is new, your headlights shouldn’t need full restoration. However, applying the ceramic protection included in the kit can prevent future oxidation. Think of it as preventative care that keeps them looking new for longer.